
Table of Contents
Introduction
In this guide, we will explore Docker and its significance in modern software development. Docker is a popular open-source platform that allows you to automate the deployment and management of applications within lightweight, portable containers.
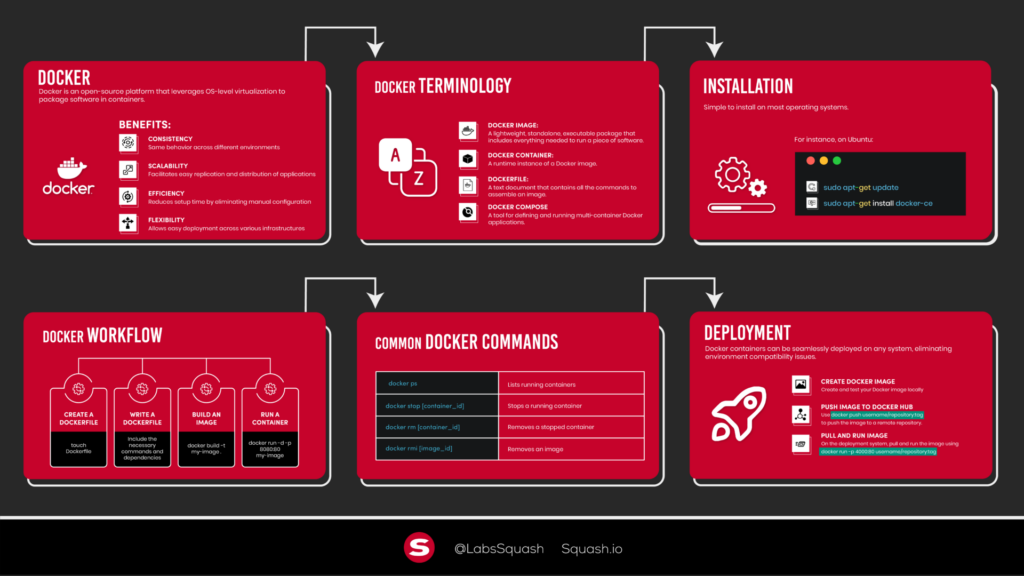
Why is Docker important? Well, traditional software deployment often involves managing dependencies and configuring environments, which can be time-consuming and prone to errors. Docker simplifies this process by encapsulating applications and their dependencies into isolated containers, making them highly portable and consistent across different environments.
With Docker, you can easily package your application along with all its dependencies, libraries, and configuration files into a single container. This container can then be deployed on any system that has Docker installed, ensuring that your application runs reliably and consistently across different environments.
So, let's dive into the world of Docker and learn how to leverage its power for your software development projects.
# Dockerfile example
FROM python:3.9
WORKDIR /app
COPY . .
RUN pip install -r requirements.txt
CMD ["python", "app.py"]
In the next section, we will get started with Docker by installing it on your system and Dockerizing your first application.
Related Article: Terraform Advanced Tips for AWS
Getting Started with Docker
Now that we understand the basics of Docker, let's get started by installing Docker on your system and Dockerizing your first application.
Installing Docker on Your System
To begin, you need to install Docker on your machine. Docker provides installation packages for various operating systems, including Windows, macOS, and Linux. Follow the appropriate installation instructions for your system by visiting the official Docker website.
Once Docker is successfully installed, you can verify the installation by opening a terminal or command prompt and running the following command:
docker --version
This command will display the version of Docker installed on your system, confirming that the installation was successful.
Dockerizing Your First Application
Now that Docker is up and running, it's time to Dockerize your first application. Dockerizing an application involves creating a Docker image that contains your application's code, dependencies, and configuration.
To start, navigate to your application's directory in the terminal or command prompt. Ensure that your application is self-contained and includes a configuration file (if needed) and any required dependencies.
Next, create a file named Dockerfile in your application's directory. The Dockerfile is a text file that contains instructions for building a Docker image.
Open the Dockerfile using a text editor and add the following instructions:
# Use a base image (e.g., Python)
FROM python:3.9

# Set the working directory inside the container
WORKDIR /app

# Copy the application code to the container
COPY . .

# Install dependencies
RUN pip install -r requirements.txt

# Specify the command to run the application
CMD ["python", "app.py"]
Let's break down the Dockerfile instructions:
- FROM: Specifies the base image to use. In this example, we use the official Python 3.9 image.
- WORKDIR: Sets the working directory inside the container where the application code will be copied.
- COPY: Copies the application code from the host machine to the container.
- RUN: Executes commands inside the container. Here, we install the application dependencies specified in the requirements.txt file.
- CMD: Specifies the command to run when the container starts. In this case, we run the app.py file using Python.
Save the Dockerfile and return to the terminal or command prompt. Build the Docker image by running the following command:
docker build -t my-docker-app .
This command builds a Docker image based on the instructions in the Dockerfile and assigns it the tag my-docker-app.
Once the image is built, you can run it as a container using the following command:
docker run my-docker-app
Congratulations! You have successfully Dockerized your first application. The application will now run inside a Docker container, isolated from the host system.
In the next section, we will explore Docker images in more detail, including building custom images and pulling/pushing images from/to Docker Hub.
Docker Images
In this section, we will delve deeper into Docker images. Docker images serve as the building blocks for containers, encapsulating everything needed to run an application.
Related Article: How to Design and Manage a Serverless Architecture
Exploring the Concept of Docker Images
A Docker image is a lightweight, standalone, and executable software package that includes everything needed to run an application, such as the code, runtime, libraries, and dependencies. Images are built based on a set of instructions specified in a Dockerfile.
Docker images are stored in a registry, such as Docker Hub, where they can be shared and distributed. You can also create custom images tailored to your specific application requirements.
To explore existing Docker images, you can use the docker search command. For example, to search for images related to Python, run the following command:
docker search python
This command will display a list of available Python-related images from Docker Hub.
Building Custom Docker Images
Building custom Docker images allows you to package your application along with its dependencies and configurations.
To create a custom Docker image, you need to define a Dockerfile that specifies the necessary instructions. Let's go through an example to illustrate the process.
Suppose you have a simple Python Flask application that serves a web page. Create a new directory for your project and navigate to it in the terminal or command prompt.
Inside the project directory, create a new file named Dockerfile and open it in a text editor. Add the following instructions:
# Use a base image (e.g., Python)
FROM python:3.9

# Set the working directory inside the container
WORKDIR /app

# Copy the application code to the container
COPY . .

# Install dependencies
RUN pip install -r requirements.txt

# Expose the application port
EXPOSE 5000

# Specify the command to run the application
CMD ["python", "app.py"]
In this example, we start with the official Python 3.9 image, set the working directory, copy the application code, install dependencies, expose port 5000 (the default Flask port), and specify the command to run the application.
Save the Dockerfile and return to the terminal or command prompt. Build the Docker image using the following command:
docker build -t my-flask-app .
The -t flag assigns a tag (name) to the image. In this case, we name it my-flask-app.
Once the image is built, you can run it as a container using the following command:
docker run -p 5000:5000 my-flask-app
This command runs the container and maps port 5000 of the container to port 5000 of the host machine. Now you can access your Flask application by visiting http://localhost:5000 in your web browser.
Pulling and Pushing Docker Images from/to Docker Hub
Docker Hub is a cloud-based registry that hosts a vast collection of public Docker images. You can pull images from Docker Hub to your local machine and push your custom images to share with others.
To pull an image from Docker Hub, use the docker pull command followed by the image name and optional tag. For example, to pull the official Python image with tag 3.9, run the following command:
docker pull python:3.9
This command downloads the specified image to your local machine, making it available for running containers.
To push a custom image to Docker Hub, you need to create an account on Docker Hub and log in using the docker login command. Once logged in, you can push an image to your Docker Hub repository using the following steps:
1. Build your custom Docker image as we discussed in the previous section.
2. Tag your image with your Docker Hub username and the desired repository name. Use the following command:
docker tag my-flask-app your-docker-hub-username/my-repo-name
Replace my-flask-app with the name of your image and your-docker-hub-username/my-repo-name with the appropriate values.
3. Push the tagged image to Docker Hub using the following command:
docker push your-docker-hub-username/my-repo-name
This command pushes your image to the specified Docker Hub repository.
Now, your custom image is available on Docker Hub for others to use and pull to their local machines.
In the next section, we will dive into Docker containers, which are instances of Docker images that can be executed and run independently.
Docker Containers
In this section, we will explore Docker containers, which are lightweight and isolated environments that run instances of Docker images.
Related Article: Comparing Kubernetes vs Docker
Creating and Managing Docker Containers
A Docker container is a runnable instance of a Docker image. Containers are isolated from each other and the host system, making them an efficient and secure way to run applications.
To create a Docker container, you can use the docker run command followed by the image name. For example, to run a container from the my-flask-app image, use the following command:
docker run my-flask-app
This command will start a new container based on the specified image. The container will execute the command specified in the CMD instruction of the Dockerfile.
By default, containers are isolated from the host system, but they can still communicate with the outside world through defined network interfaces.
Interacting with Docker Containers
Once you have containers running, you may need to interact with them for various purposes, such as executing commands, copying files, or accessing logs.
To interact with a running container, you can use the following commands:
- docker exec: Runs a command inside a running container. For example, to execute a shell command inside a container, use the following command:
docker exec -it container-id COMMAND
Replace container-id with the ID or name of the container and COMMAND with the desired command.
- docker cp: Copies files between a container and the host machine. To copy a file from a container to the host, use the following command:
docker cp : container-id:source-path destination-path
Replace container-id with the ID or name of the container, source-path with the path of the file inside the container, and destination-path with the path where you want to copy the file on the host machine.
- docker logs: Retrieves the logs of a container. To view the logs of a container, use the following command:
docker logs container-id
Replace container-id with the ID or name of the container.
These commands allow you to interact with running containers and perform various operations as needed.
Configuring Docker Container Networking
Docker provides different networking options to facilitate communication between containers and the outside world.
By default, each container is assigned its own unique IP address and can communicate with other containers using their IP addresses or container names. Docker also supports port mapping, allowing you to expose container ports to the host system or other containers.
To expose a container port to the host system, you can use the -p flag when running the container. For example, to expose port 5000 of a container and map it to port 8080 on the host, use the following command:
docker run -p 8080:5000 my-flask-app
This command maps port 5000 of the container to port 8080 on the host machine.
Docker also provides advanced networking features, such as creating custom networks, connecting containers to specific networks, and using DNS-based service discovery.
Understanding and configuring Docker container networking is essential to enable seamless communication between containers and external resources.
In the next section, we will explore Docker volumes, which provide a way to manage data persistence within containers.
Docker Volumes
In this section, we will dive into Docker volumes, which enable data persistence and sharing between containers.
Related Article: Quick Docker Cheat Sheet: Simplify Containerization
Managing Data Persistence with Docker Volumes
Docker volumes are directories or file systems that exist outside the container's writable layer. They provide a mechanism to store and manage persistent data used by containers.
Volumes have several advantages over storing data inside containers. They are independent of the container's lifecycle, allowing data to persist even if the container is stopped or deleted. Volumes can also be shared between containers, enabling data sharing and collaboration.
To create a Docker volume, you can use the docker volume create command. For example, to create a volume named my-volume, use the following command:
docker volume create my-volume
Once a volume is created, you can mount it to containers when running them.
Mounting Host Directories as Volumes
In addition to creating Docker-managed volumes, you can also mount directories from the host machine as volumes within containers. This allows you to easily share files between the host and containers.
To mount a host directory as a volume, use the -v or --volume flag when running a container. For example, to mount the data directory from the host machine to a container's /app/data directory, use the following command:
docker run -v /path/to/host/data:/app/data my-image
Replace /path/to/host/data with the actual path to the host directory and my-image with the name of the Docker image you want to run.
Now, any changes made to the /app/data directory within the container will be reflected in the host directory, and vice versa.
Sharing Data Between Containers using Volumes
One of the powerful features of Docker volumes is the ability to share data between multiple containers. This allows you to decouple data storage from application logic, enabling collaboration and modularity.
To share a volume between containers, you can specify the volume name or use the --volumes-from flag when running a container.
For example, let's say you have two containers: container1 and container2, and you want to share data between them using a volume named shared-data. You can achieve this by running the containers with the following commands:
docker run -v shared-data:/app/data --name container1 my-image1
docker run --volumes-from container1 --name container2 my-image2
In this example, container1 creates and mounts the shared-data volume. container2 uses the --volumes-from flag to inherit the volumes from container1, allowing both containers to access and modify the shared data.
By leveraging Docker volumes, you can achieve data persistence and easily share data between containers, enhancing the flexibility and modularity of your Dockerized applications.
In the next section, we will explore Docker Compose, a tool for simplifying the orchestration of multi-container applications.
Docker Compose
In this section, we will explore Docker Compose, a tool that simplifies the management and orchestration of multi-container applications.
Related Article: How to Pass Environment Variables to Docker Containers
Simplifying Multi-Container Applications with Docker Compose
Docker Compose is a tool that allows you to define and manage multi-container applications using a YAML file. It provides a simple and declarative way to define services, networks, and volumes, making it easier to run and scale complex applications.
With Docker Compose, you can define the configuration of your application's services, including their dependencies and network settings, in a single file. This eliminates the need to manually run and manage multiple docker run commands.
Defining Services and Dependencies in Docker Compose
To define services and their dependencies in Docker Compose, you create a docker-compose.yml file in your project directory. This file describes the services, networks, and volumes required for your application.
Here's an example docker-compose.yml file that defines two services: a web application and a database:
version: '3'
services:
   web:
       build: .
       ports:
        - 8080:80
       depends_on:
        - db
   db:
     image: mysql:5.7
     environment:
        - MYSQL_ROOT_PASSWORD=secret
        - MYSQL_DATABASE=myapp
      volumes:
        - db-data:/var/lib/mysql
   volumes:
     db-data:
In this example, we define two services: web and db. The web service builds an image using the local Dockerfile in the current directory and exposes port 8080 on the host, mapped to port 80 in the container. It also specifies that it depends on the db service.
The db service uses the mysql:5.7 image from Docker Hub and sets environment variables for the root password and the database name. It also creates a volume named db-data to persist the MySQL data.
Running and Scaling Docker Compose Applications
Once you have defined your services in the docker-compose.yml file, you can use the docker-compose command to manage your multi-container application.
To start the application, navigate to the directory containing the docker-compose.yml file in the terminal or command prompt, and run the following command:
docker-compose up
This command reads the docker-compose.yml file, builds the necessary images, and starts the defined services.
To scale a service, you can use the docker-compose up command with the --scale flag. For example, to scale the web service to three instances, use the following command:
docker-compose up --scale web=3
This command will create and run three instances of the web service.
To stop the application and remove the containers, use the following command:
docker-compose down
Docker Compose provides additional commands and options for managing and inspecting your multi-container applications. Refer to the Docker Compose documentation for more details.
In the next section, we will explore Docker Swarm, a native clustering and orchestration solution for Docker.
Docker Swarm
In this section, we will explore Docker Swarm, which is a native clustering and orchestration solution for Docker. Docker Swarm allows you to create and manage a swarm of Docker nodes to run and scale your applications.
Related Article: Tutorial: Building a Laravel 9 Real Estate Listing App
Scaling Your Application with Docker Swarm
Docker Swarm enables you to scale your application horizontally by distributing it across multiple nodes within a swarm. A swarm consists of one or more manager nodes and worker nodes, collectively forming a cluster.
To create a Docker swarm, you need to initialize a manager node. Run the following command on the machine you want to be the manager node:
docker swarm init
This command initializes the swarm and generates a join token that worker nodes can use to join the swarm.
Once the swarm is initialized, you can add worker nodes to the swarm by running the join command on each worker node. The join command is provided in the output of the docker swarm init command. It looks like this:
docker swarm join --token token manager-ip:manager-port
Replace token with the generated join token and manager-ip:manager-port with the IP address and port of the manager node.
Creating a Swarm Cluster
After initializing the swarm and adding worker nodes, you have a swarm cluster ready to deploy and manage services.
A service in Docker Swarm represents a task or a set of tasks that should be executed on the swarm. Services are the primary units of work in a swarm and are responsible for managing the desired state of your application.
To create a service, you can use the docker service create command followed by the desired options and specifications. For example, to create a service named web based on the my-web-image image, use the following command:
docker service create --name web --replicas 3 -p 8080:80 my-web-image
This command creates a service named web with three replicas, mapping port 8080 of the host to port 80 of the service's containers.
Deploying and Managing Services in Docker Swarm
Once the services are created, Docker Swarm automatically distributes and runs the service tasks across the available worker nodes.
To manage the services in Docker Swarm, you can use various commands, such as:
- docker service ls: Lists all the services in the swarm.
- docker service scale: Scales the number of replicas for a service.
- docker service update: Updates the configuration of a service.
- docker service rm: Removes a service from the swarm.
These commands allow you to deploy, scale, update, and remove services in your Docker Swarm cluster.
Docker Swarm Visualizer
Docker Swarm also provides a web-based visualization tool called Docker Swarm Visualizer. It gives you a graphical representation of your swarm, showing the status and placement of services and containers across the nodes.
To use Docker Swarm Visualizer, you can deploy it as a service in your swarm cluster. There are pre-built images available on Docker Hub specifically for this purpose.
With Docker Swarm Visualizer, you can easily monitor the state of your services and containers in the swarm, facilitating effective management and troubleshooting.
In the next section, we will explore Docker security and best practices to ensure the safety of your containerized applications.
Related Article: Mastering Microservices: A Comprehensive Guide to Building Scalable and Agile Applications
Docker Security
In this section, we will discuss container security best practices and explore various features provided by Docker to enhance the security of your containerized applications.
Understanding Container Security Best Practices
Container security is a crucial aspect of running Dockerized applications. By following best practices, you can mitigate potential risks and vulnerabilities.
Here are some key container security best practices to consider:
- Use Official Images: Whenever possible, use official Docker images from trusted sources, such as the Docker Hub. Official images are regularly maintained and updated, reducing the likelihood of security vulnerabilities.
- Update Regularly: Keep your Docker installation and images up to date with the latest security patches. This helps protect against known vulnerabilities and exploits.
- Minimize Image Size: Build minimalistic images by only including necessary dependencies and components. Reducing the image size decreases the attack surface and potential vulnerabilities.
- Avoid Running as Root: Within the container, avoid running processes as the root user. Instead, use non-root users with restricted permissions to limit the potential impact of a security breach.
- Apply Principle of Least Privilege: Assign minimal permissions to container processes and limit access to host system resources. Restrict unnecessary network access and mount only required volumes.
- Scan Images for Vulnerabilities: Utilize Docker image scanning tools to identify and mitigate potential vulnerabilities in your images. These tools analyze image contents and provide insights into potential security issues.
- Monitor and Log: Enable logging within your containers and monitor logs for suspicious activities. Implement centralized logging to facilitate easier detection of security events.
Isolating Containers using Docker Security Features
Docker provides several security features to isolate containers and protect them from potential threats.
- Namespaces: Docker uses Linux namespaces to provide isolation between containers and the host system. Namespaces separate various aspects of the container, such as the file system, network, and process IDs, preventing interference and unauthorized access.
- Control Groups (cgroups): Docker leverages cgroups to limit and manage resource usage for containers. Resource limits can prevent container processes from consuming excessive CPU, memory, or other system resources.
- AppArmor and SELinux: Docker supports security profiles provided by AppArmor and SELinux, which allow fine-grained control over container capabilities and access permissions. These security profiles help enforce stricter security policies.
- Seccomp: Docker allows you to enable Seccomp (Secure Computing Mode) profiles for containers. Seccomp filters system calls, providing an additional layer of protection by limiting the container's interaction with the host kernel.
By leveraging these security features, you can enhance the isolation and protection of your containers, reducing the risk of security breaches.
Scanning Docker Images for Vulnerabilities
To ensure the security of your Docker images, it is essential to scan them for known vulnerabilities.
There are various tools and services available that can analyze your images and provide reports on potential security issues. These tools check the software versions, libraries, and components within your images against known vulnerability databases.
Popular image scanning tools include:
- Docker Security Scanning: Docker Hub provides an image scanning feature that analyzes your images for vulnerabilities. It alerts you to any discovered issues, helping you make informed decisions regarding image security.
- Clair: An open-source vulnerability scanner specifically designed for containers. It can be integrated into your CI/CD pipeline to automatically scan images for vulnerabilities.
- Trivy: A comprehensive vulnerability scanner that supports scanning Docker images, as well as other container and package formats. Trivy can be integrated into your development workflow to ensure continuous security checks.
By incorporating image scanning into your development process, you can proactively identify and address potential security vulnerabilities before deploying your applications.
In the next section, we will explore advanced Docker concepts, including best practices for writing Dockerfiles and integrating Dockerfiles and integrating Docker with other tools and technologies.
Related Article: An Overview of DevOps Automation Tools
Advanced Docker Concepts
In this section, we will delve into advanced Docker concepts that will help you optimize your Docker workflows and enhance the efficiency of your containerized applications.
Dockerfile Best Practices
When writing Dockerfiles, it is essential to follow best practices to ensure efficient image builds and maintainable container configurations. Here are some key Dockerfile best practices:
- Use Official Base Images: Start your Dockerfile with an official base image relevant to your application. Official images are regularly updated and provide a solid foundation for building your custom images.
- Leverage Caching: Structure your Dockerfile in a way that takes advantage of Docker's layer caching mechanism. Place instructions that are less likely to change at the beginning of the file, and instructions that are more likely to change towards the end. This helps speed up image builds by reusing cached layers.
- Minimize Image Layers: Reduce the number of layers in your image by combining related instructions. Each instruction in a Dockerfile creates a new layer, so consolidating instructions into a single layer helps reduce image size and build time.
- Optimize Package Installations: When installing packages, minimize the number of package installations and remove unnecessary dependencies after installation. This helps keep the image size smaller and reduces the attack surface.
- Clean Up Unnecessary Files: Remove temporary files and artifacts generated during the image build process. Use the RUN instruction to clean up any files or directories that are no longer needed.
- Securely Handle Secrets: Avoid adding sensitive information, such as passwords or API keys, directly in the Dockerfile. Instead, utilize Docker's secret management features or environment variables to securely handle sensitive data.
By following these best practices, you can create efficient and secure Docker images that are easier to manage and maintain.
Container Orchestration with Kubernetes and Docker
Docker is often used in conjunction with container orchestration platforms like Kubernetes. Kubernetes provides advanced capabilities for managing and scaling containerized applications.
Kubernetes allows you to define and deploy Docker containers as part of a larger cluster. It handles tasks such as container scheduling, scaling, load balancing, and service discovery.
To integrate Docker with Kubernetes, you can package your Docker images into Kubernetes-compatible artifacts called Pods, which represent one or more containers and their shared resources.
Kubernetes provides tools and abstractions to manage Pods, including Deployments, Services, and ConfigMaps. These abstractions enable you to define and control the desired state of your application, handle scaling and rolling updates, and manage application configuration.
By leveraging Kubernetes alongside Docker, you can benefit from powerful container orchestration features and effectively manage containerized applications at scale.
Exploring Docker API and CLI
Docker exposes an API and a Command-Line Interface (CLI) that allow programmatic interaction and management of Docker resources.
The Docker API provides a set of RESTful endpoints that can be used to manage containers, images, volumes, networks, and other Docker-related resources. You can interact with the Docker API using HTTP requests and handle responses in various programming languages.
The Docker CLI, on the other hand, provides a command-line interface to interact with Docker. It offers a wide range of commands for building and managing Docker images, running containers, managing networks, and much more.
By utilizing the Docker API and CLI, you can automate Docker-related tasks, integrate Docker with other tools and systems, and build custom workflows to streamline your containerized workflows.
In the next section, we will unleash the power of Docker by exploring creative and unique ways to leverage Docker in your projects.
Unleash the Power of Docker
In this section, we will explore creative and unique ways to leverage the power of Docker in your projects. Docker provides a flexible and versatile platform that can be utilized in various innovative ways.
Related Article: How to use AWS Lambda for Serverless Computing
Containerize Legacy Applications
One powerful application of Docker is containerizing legacy applications. Legacy applications are often challenging to deploy and maintain due to compatibility issues and complex dependencies. By containerizing them with Docker, you can encapsulate the entire application stack, including its dependencies, libraries, and configurations. This allows you to run legacy applications in isolated and consistent environments, making them easier to deploy, manage, and migrate.
Continuous Integration and Delivery (CI/CD) Pipelines
Docker is a valuable tool in CI/CD pipelines. By creating Docker images that encapsulate your application and its dependencies, you can ensure consistent builds and deployments across different stages of the pipeline. Docker images can be versioned, tagged, and pushed to repositories, enabling seamless integration with popular CI/CD tools like Jenkins, GitLab CI/CD, and CircleCI. Containers can be spun up quickly to run tests, perform builds, and deploy applications, speeding up the development and delivery process.
Microservices Architecture
Docker is an excellent choice for building microservices-based architectures. With Docker, you can package each microservice into a separate container, allowing them to run independently while communicating with each other through well-defined APIs. This approach provides flexibility, scalability, and resilience to your applications. Docker's orchestration tools like Kubernetes and Docker Swarm further enhance the management and scaling of microservices.
Hybrid Cloud Deployments
Docker enables hybrid cloud deployments by providing a consistent runtime environment across different cloud platforms. You can develop and test your applications locally using Docker and then deploy the same containers to public cloud providers like AWS, Azure, or Google Cloud Platform. Docker's portability ensures that your applications run consistently, regardless of the underlying infrastructure. This flexibility allows you to leverage the best features and services of different cloud providers while maintaining a unified development and deployment workflow.
Related Article: Smoke Testing Best Practices: How to Catch Critical Issues Early
Internet of Things (IoT) Edge Computing
Docker is well-suited for IoT edge computing scenarios. By containerizing IoT applications and services, you can deploy them on edge devices, such as gateways or Raspberry Pis, with limited resources. Docker's lightweight and isolated containers allow you to run multiple applications on edge devices while ensuring resource efficiency and security. With Docker, you can easily manage and update applications deployed at the edge, making it ideal for IoT use cases.
DevOps Environments and Reproducible Research
Docker provides a reliable and reproducible environment for DevOps teams and researchers. By creating Docker images that contain the necessary tools, libraries, and configurations, you can ensure consistent environments for development, testing, and experimentation. Docker images can be versioned, shared, and deployed across different systems, enabling collaboration and facilitating reproducible research.
Unleash the power of Docker by exploring these creative and unique ways to leverage its capabilities in your projects. Docker's versatility and flexibility make it an invaluable tool for modern software development and deployment.