Downloading code inside a container (private repos)
Please note that the steps below are only required for private repositories.
By default Squash uses OAuth access tokens from the hosted Version Control System provider (GitHub, Bitbucket or GitLab) in order to fetch a branch's code during a Squash deployment. We do this in order to keep the amount of permissions on each provider down to a minimum and avoid requesting for any admin permissions.
This approach creates a small overhead when it comes to manual code updates in Squash deployments, specifically inside a container where you run your application. You need to manually add a Squash deployment key on your GitHub/GitLab/Bitbucket repository if your application build process uses Git commands to pull code from a private repo.
The Squash SSH Keys
Squash automatically creates a secure and unique pair (public and private key) of SSH keys for each repository. These keys are automatically generated only once when you add a new repository in Squash.
All you need to do is to copy the Squash public key and add it into your Git repository. Squash automatically adds both the private and public keys under the .ssh folder on each Squash host VM. Below you will find a step by step process on how to get this quickly setup. You only need to do this once for each repository you are using with Squash.
How to get the Squash Deployment Key
Note: you need Admin or "Technical Admin" permissions in Squash in order to access the pages below.
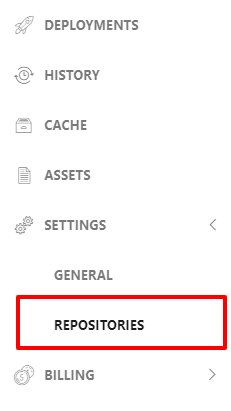
First go to Settings -> Repositories
Then click on "Settings" for the desired repository.

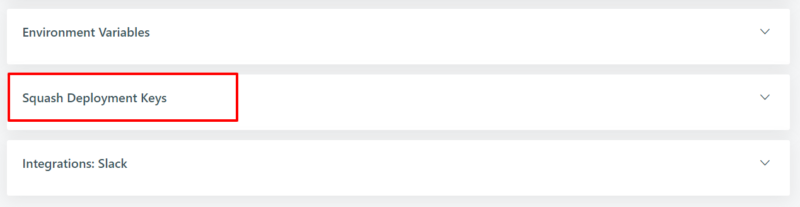
Then open the "Squash Deployment Keys" accordion:
Open the "View/Download" link and copy the public key in the page:
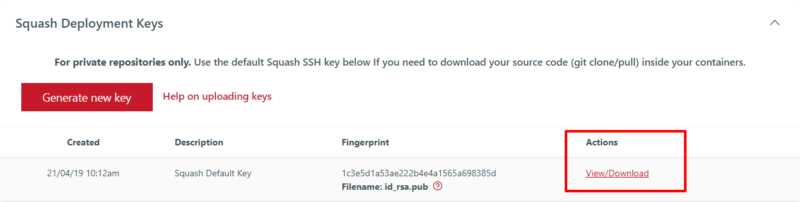
This is the key you need to add into your VCS provider. See steps below for each provider.
Multiple Squash keys per repository
In some scenarios you might need to generate more than one pair of Squash deployment keys. This is the case when you need to manually pull code from more than one repository within the same Squash deployment. For such cases you just need to click on the "Generate new key" button and add as many keys as needed.

Squash will automatically assign unique file names for the key pairs. Each pair will be automatically added within the .ssh folder on all Squash deployments associated with this repository.
How to add a deploy key in GitHub
Note: you need admin permissions in a GitHub repository in order to add deploy keys.
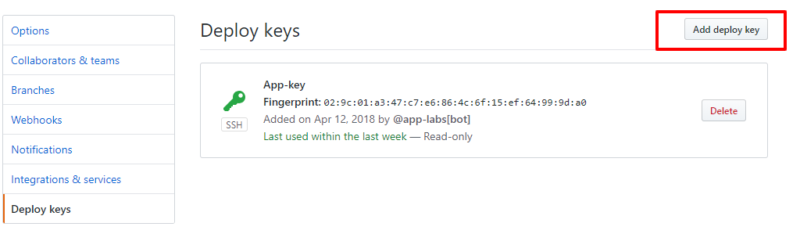
To add a deploy key in GitHub, first go to the Settings tab:

And then click on "Deploy keys" on the left hand side menu, and click on the "Add deploy key" button.
And then:
- Paste the Squash SSH key into the "Key" field below
- You can use anything descriptive in the "Title" field, for instance "Squash Deploy Key"
- Leave the "Allow Write access" unchecked, Squash does not require write access.
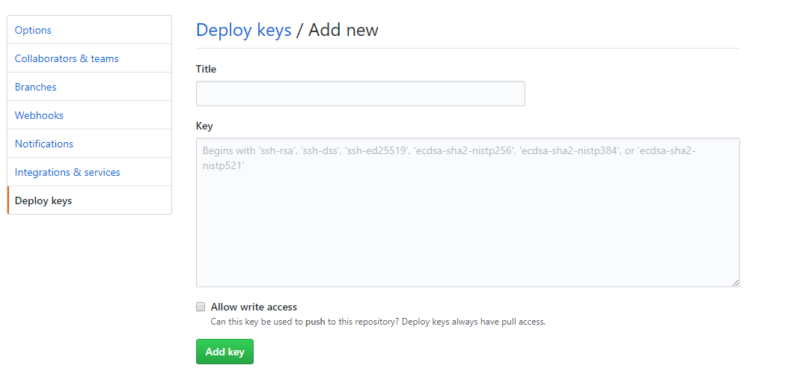
How to add a deploy key in GitLab
Open a repository in GitLab and then click on Settings -> Repository:
Then click on "Deploy Keys":

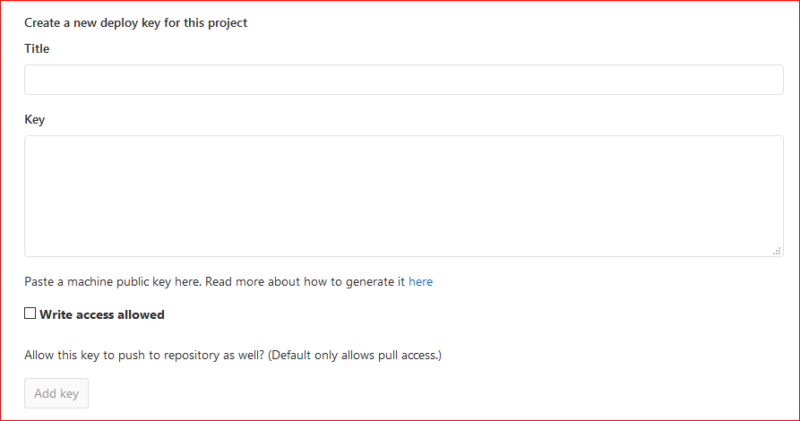
Then paste the Squash key in the form as follows:
- Paste the Squash SSH key into the "Key" field below
- You can use anything descriptive in the "Title" field, for instance "Squash Deploy Key"
- Leave the "Write access allowed" unchecked, Squash does not require write access.
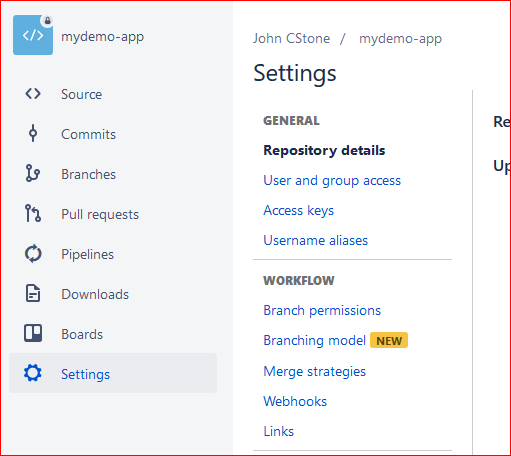
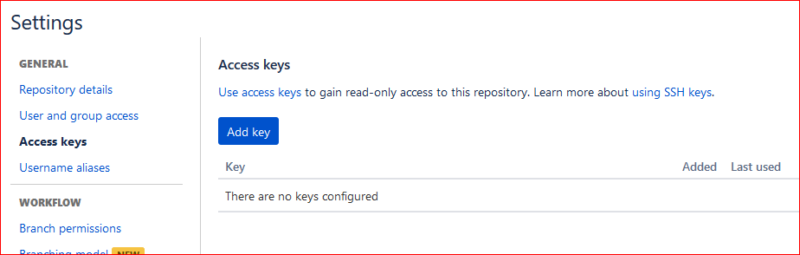
How to add a deploy key in Bitbucket
Open a repository in Bitbucket and then go to Settings - > Access keys:
Then click on "Add key" and post the Squash key in the form:
Using the Squash SSH keys inside your app
One simple way to use the Squash SSH Keys inside your app is by using the copy_files field of the Squash YAML file to automatically copy the Squash keys to a location inside the build path of your application (more info on the Squash build process). For example:
copy_files:
  - ~/.ssh/id_rsa ~/code/myapp/docker-path/
  - ~/.ssh/id_rsa.pub ~/code/myapp/docker-path/
Then use these files within your application build process to place them within the home folder of the correct user.
Example using a Docker file:
FROM ruby:2.5.1
RUN apt-get update -qq && \
  apt-get install -y build-essential libpq-dev
RUN mkdir -p /home/myappuser/.ssh
ADD id_rsa /home/myappuser/.ssh/
ADD id_rsa.pub /home/myappuser/.ssh/
Example without Docker:
- We need to define the "copy_files" field to actually copy the keys to the right folder within the app's source code. Squash by default stores your code under ~/code/
- Then we need to copy the SSH keys within the post_build_steps command, this is where the keys get actually placed within the home folder of the container where the app is running:
deployments:
  default:
    dockerimage: python:latest
    build_steps:
      - apt-get update && apt-get install -y libssl-dev libpq-dev git curl
      - RUN bash -c "curl -sL https://deb.nodesource.com/setup_8.x | bash -"
      - apt install -y nodejs
    post_build_steps:
      - mkdir -p ~/.ssh
      - cp id_rsa ~/.ssh/
      - cp id_rsa.pub ~/.ssh/
      - python manage.py migrate
    launch_steps:
      - cd /myproject/mysite
      - python manage.py runserver 0.0.0.0:80
    copy_files:
      - ~/.ssh/id_rsa ~/code/
      - ~/.ssh/id_rsa.pub ~/code/