Pipelines
This feature is currently not available for accounts under the free plan. For more details please go to our plans page.
Squash allows you to define multiple pipelines to handle the most complex use cases for executing automated scripts and even shipping code to production environments.
Use cases
- Run all your unit tests, regression/functional tests using any framework.
- Automatically ship changes to cloud providers and third-party services.
- Automatically ship changes to production once all tests have passed.
How it works and sample YAML file
In order to start using this feature you need to define a "pipelines" field in the Squash YAML file, and then define one or more jobs. You can also group jobs and add a dependency chain between them (more below).
Here is how a simple Pipeline configuration would look like. For the example below we are defining three jobs:
- API Tests
- Cart Tests
- Frontend Tests
Each one of these jobs will be executed in parallel on their own separate virtual machine, providing optimal isolation. For the example below Squash will commission three virtual machines.
deployments:
  MyApp:
    filename:
      ./Dockerfile
    pipelines:
      - API Tests:
        scripts:
            - ./src/main.sh
            - ./src/api-tests.py

      - Cart Tests:
        scripts:
            - ./src/cart-tests.sh

      - Frontend Tests:
        scripts:
            - ./src/frontend-tests.sh
For the example above Squash will display the following in the Squash Pipelines page when you push a new commit to a branch:
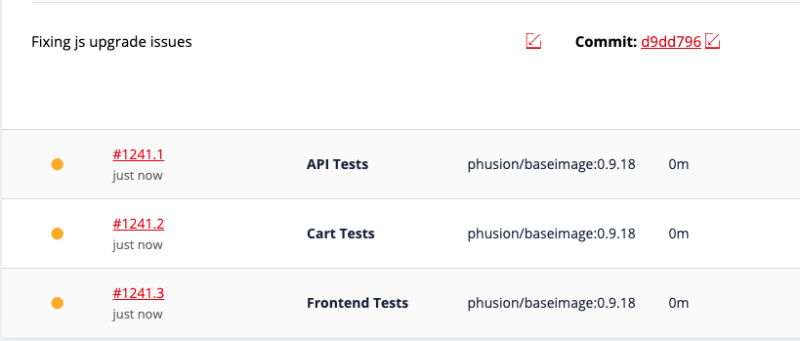
Each table row above represents a unique job running on its own VM. Here is more info on the information contained on each cell:
- Build status:
- Yellow circle: queued, the jobs is currently scheduled to be executed and will begin running shortly.
- Blue circle: building. You can now click on the job ID and check the real time log output as the job runs.
- Green check: passed. All scripts defined for this job have returned a success status 0 (zero) exit code.
- Red check: the job has failed. One ore more scripts defined for this job have returned a non-zero exit code. You can check the logs to see the specific reason for the failure.
- Job ID: displays the pipeline ID + a unique incremental number for each job within the pipeline.
- Job Name: the job name as defined in the Squash YAML file.
- Base OS Image: the base OS image as defined in the Squash YAML file.
- Duration Time: the total time taken to run this job.
- VM Size: the VM size as defined in the Squash YAML file or Squash interface (see details below).
- Logs: a link to check the log output of each job. This is only available for all job statuses except the queued (yellow) status.
- Restart Icon: click this button to restart the job at any time.
Groups and dependencies
You may also group jobs together and define dependencies between groups. To get started just add a "group_id" field to one or more jobs. Then you repeat the same group name for all jobs that are members of the same group.
To define dependencies between groups you just need to define the "depends_on_group" field. This field requires a group name. When this field is present Squash will wait until all jobs of the dependent group are finished before starting the next group. Groups are executed in the same order as defined in the Squash YAML file.
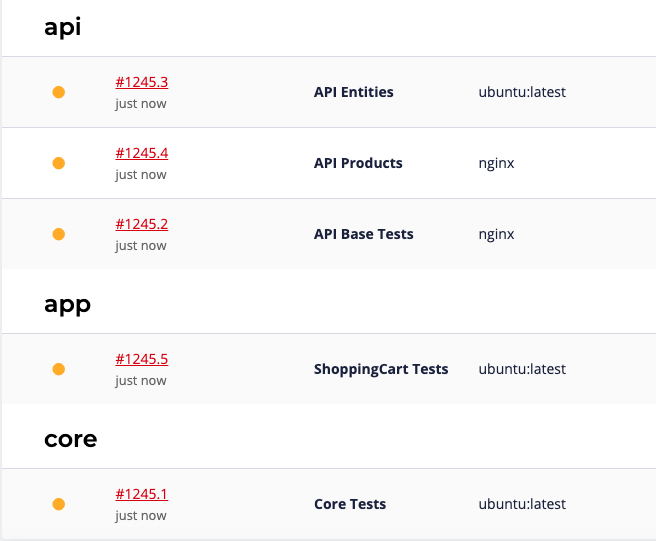
Example YAML file with three unique groups.
- The first group ("core") doesn't have any dependencies and it will start right away at the same time when the pipeline starts.
- The second group ("api") will also start right away. This group is defined under three jobs. Each job on this group will also start right away, each job will run independent and in parallel as any regular pipeline job.
- The last group "app" depends on the "api" group and it will only start after all jobs of the "api" group are completed (green or red check status).
deployments:
  MyApp:
    filename:
      ./Dockerfile
    pipelines:
      - Core Tests:
          group_id: core
          scripts:
            - ./tests/core.sh
      - API Base Tests:
          group_id: api
          scripts:
            - ./tests/api-base.sh
      - API Entities:
          group_id: api
          scripts:
            - ./tests/api-entities.sh
      - API Products:
          group_id: api
          scripts:
            - ./tests/api-products.sh
      - ShoppingCart Tests:
          group_id: app
          depends_on_group: api
          scripts:
            - ./tests/api-cart.sh
And this is how this configuration will be displayed in Squash:
Build policies and when pipelines are triggered to run
By default Squash will execute a pipeline for the following use cases:
- For any branch on the same repo where the Squash YAML with the pipeline definition is present.
- Every time a commit is pushed to any branch
- When a Pull Request is created (GitHub/Bitbucket/GitLab)
You may control the context on which certain pipelines and/or jobs will run with the "build_policy" field. For instance, here is an example that will only trigger a pipeline to run on branch "stage" and only when a Pull Request is created.
Note that this build_policy was applied on the application level and will apply to all pipeline jobs.
deployments:
  MyApp:
    dockerimage:
      ubuntu:14.04
    build_policy:
        triggers: pr
        allow_branches: stage
    pipelines:
      - API Tests:
          scripts:
            - ./src/tests-1.py
            - ./src/tests-2.py
And this example will trigger pipeline runs for all branches except branch "production". Some important notes:
- The build_policy field is defined within the "API Tests" job, it won't affect other jobs in the same pipeline.
- Since we are not defining the "triggers" field (as in the example above), the pipeline will execute on any commits pushed to branches or when Pull Requests are created. This is because the default value of the "triggers" field is "pr, commit".
deployments:
  MyApp:
    dockerimage:
      ubuntu:14.04
    pipelines:
      - API Tests:
          scripts:
            - ./src/tests-1.py
            - ./src/tests-2.py
          build_policy:
              restrict_branches: production
Example 1 - custom built steps
Here we are using a base OS image (ubuntu:14.04) from Docker Hub and then installing packages using the "build_steps" field to suit your needs. Note that the base OS image and build_steps are going to be executed for all pipeline jobs defined in this file. This is an easy way to quickly define a base environment for which all your pipeline jobs will run.
deployments:
  MyWebApp:
    dockerimage: ubuntu:14.04
    build_steps:
      - DEBIAN_FRONTEND=noninteractive apt-get update
      - DEBIAN_FRONTEND=noninteractive apt-get install -y
      - apt-get install -y libssl-dev libpq-dev git \
        python python-dev python-pip python-virtualenv
      - pip install setuptools pip
      - pip install /code
    pipelines:
      - API Tests:
          scripts:
            - ./src/tests-1.py
            - ./src/tests-2.py
You may also customize the build_steps field for specific jobs. This is useful If you have many jobs and different environment requirements for certain jobs. On the example below we are using different build_steps for the "Store Tests" job:
deployments:
  MyWebApp:
    dockerimage: ubuntu:14.04
    build_steps:
      - DEBIAN_FRONTEND=noninteractive apt-get update
      - DEBIAN_FRONTEND=noninteractive apt-get install -y
      - apt-get install -y libssl-dev libpq-dev git \
        python python-dev python-pip python-virtualenv
      - pip install setuptools pip
      - pip install /code
    pipelines:
      - API Tests:
          scripts:
            - ./src/tests-1.py
            - ./src/tests-2.py

      - Store Tests:
        build_steps:
          - DEBIAN_FRONTEND=noninteractive apt-get update
          - DEBIAN_FRONTEND=noninteractive apt-get install -y
          - apt-get install libssl-dev libpq-dev git \
          build-essential \
          libfontconfig1 libfontconfig1-dev curl
          - RUN bash -c "curl -sL https://deb.nodesource.com/setup_8.x | bash -"
          - apt install -y nodejs
          scripts:
            - ./src/tests-shop.sh
Example 2 - using a Dockerfile
Instead of using a build_steps field as in the example above you may provide the entire build process in a Dockerfile as follows:
deployments:
  MyWebApp:
    filename:
      ./src/Dockerfile
    context_path:
      ./src
    pipelines:
      - API Tests:
          scripts:
            - ./src/tests-1.py
            - ./src/tests-2.py
Example 3 - environment variables
You can define environment variables directly in the Squash YAML file or reference a variable name that is defined in the Squash web interface. For the example below we have the following:
- STRIPE_KEY: the value starts with the "$" symbol, in this case Squash will look up its value as defined in the Squash web interface. This is recommended for sensitive information.
- CUSTOM_VALUE: we are leaving its value in plain text defined in the Squash YAML file itself.
For more information please check: managing environment variables in Squash.
deployments:
  MyWebApp:
    filename:
      ./Dockerfile
   environment:
      - STRIPE_KEY=${STRIPE_KEY}
      - CUSTOM_VALUE=123
    pipelines:
      - API Tests:
          scripts:
            - ./src/tests-1.py
            - ./src/tests-2.py
Example 4 - using a private Docker registry
If you are using a Dockerfile you may also pull Docker images from a private registry, defined as follows:
deployments:
  MyApp:
    filename:
      ./Dockerfile
    docker_registry:
      server: example.com
      username: my-username
      password: $REGISTRY_PASSWORD
    pipelines:
      - API Tests:
          scripts:
            - ./src/tests-1.py
            - ./src/tests-2.py
FAQ
Do pipeline jobs run on their own virtual machines?
Yes, each job in a pipeline run in their own unique virtual machine. The default VM size (memory, CPU and storage) follows the same default settings defined in the Squash dashboard.
What if I need more memory, storage or CPU for my pipeline jobs?
You can resize any jobs on a global (application) level or for each specific job.
Example where we define a bigger VM size on a global (application) level. All jobs for this pipeline will run on a 2GB VM size:
deployments:
  MyApp:
    dockerimage:
      ubuntu:14.04
    vm_size:
      2GB
    pipelines:
      - API Entities:
          scripts:
            - ./src/tests/api-entities.py
      - API Products:
          scripts:
            - ./src/tests/api-products.sh
      - ShoppingCart Tests:
          scripts:
            - ./src/tests/api-cart.sh
And here we have only the last job on a 4GB VM and with a custom storage size:
deployments:
  MyApp:
    dockerimage:
      ubuntu:14.04
    vm_size:
      2GB
    pipelines:
      - API Entities:
          scripts:
            - ./src/tests/api-entities.py
      - API Products:
          scripts:
            - ./src/tests/api-products.sh
      - ShoppingCart Tests:
          vm_size: 4GB
          vm_storage_gb: 120
          scripts:
            - ./src/tests/api-cart.sh
How are pipeline jobs decommissioned?
Pipeline jobs are automatically decommissioned once the execution of the commands within the "scripts" field is completed.
Are there any time limits for pipeline jobs and commands?
There is currently no hard limit/TTL on how long a pipeline job can take to fully complete.
There is, however, a 30 min timeout for each individual command within the "script" field of a pipeline job. For example:
deployments:
  MyApp:
    dockerimage:
      ubuntu:14.04
    pipelines:
      - API Tests:
          scripts:
            - ./src/tests-1.py
            - ./src/tests-2.py
For the example above, tests-1.py needs to complete under 30 min, then once this script is finished Squash will restart the TTL for the next script and tests-2.py will also need to complete under 30 min. A script that takes more than 30 min to complete will automatically fail.